
Learn Navbar with AutoComplete Search Box and implement in your web project
The navigation bar is one of the important components in the website, which allows the user to navigate the website. Materialize CSS provides several variations, however, there are no variants with the Navigation bar with Search. For several websites, it requires a search box to be embedded in the Navigation Bar. The following tutorials will help you to embed the search bar in the Navigation Bar. The search functionality adapted in this tutorial is Autocomplete Search Bar provided in the Materialize CSS website.
Step 1:
Create a dummy Materialize CSS framework template from the Materialize CSS website. You can either use CDN method or download the respective CSS and JS file from the website. In this tutorial, we have utilized CDN, alternatively, you can download the files and add the CSS and JS links in the HTML file.
http://materializecss.com/getting-started.html
<!DOCTYPE html>
<html>
<head>
<!--Import Google Icon Font-->
<link href="http://fonts.googleapis.com/icon?family=Material+Icons" rel="stylesheet">
<!--Import materialize.css-->
<link rel="stylesheet" href="https://cdnjs.cloudflare.com/ajax/libs/materialize/0.98.1/css/materialize.min.css">
<!--Let browser know website is optimized for mobile-->
<meta name="viewport" content="width=device-width, initial-scale=1.0"/>
</head>
<body>

<!--Import jQuery before materialize.js-->
<script type="text/javascript" src="https://code.jquery.com/jquery-2.1.1.min.js"></script>
<script src="https://cdnjs.cloudflare.com/ajax/libs/materialize/0.98.1/js/materialize.min.js"></script>
</body>
</html>
Step 2
Once you have created the template, the next step will be adding Navigation Bar to the HTML.
<nav>
<div class="nav-wrapper">
<a href="#" class="brand-logo">Logo</a>
<ul id="nav-mobile" class="right hide-on-med-and-down">
<li><a href="sass.html">Sass</a></li>
<li><a href="badges.html">Components</a></li>
<li><a href="collapsible.html">JavaScript</a></li>
</ul>
</div>
</nav>
Step 3:
After inserting the Navigation Bar, we need to customize the Navigation Bar according to our needs. Here, we have changed the colour of the Navigation Bar to white and fixed the Autocomplete Search Box in the Navigation Bar, however, these can be customized by tweaking the CSS property.
<nav class=”white”> will change the Navbar to white
Since all the text in the HTML file is in white colour, we need to change the colour to red. This can be done by simply adding class=”red-text” inside the respective elements.
Once we have changed the font colour to red, we need to insert the autocomplete search from the Materialize CSS and add the respective js in the script section.
<div class="row">
<div class="col s12">
<div class="row">
<div class="input-field col s12">
<i class="material-icons prefix">textsms</i>
<input type="text" id="autocomplete-input" class="autocomplete">
<label for="autocomplete-input">Autocomplete</label>
</div>
</div>
</div>
</div>
<script>
$(document).ready(function(){
$('input.autocomplete').autocomplete({
data: {
"Apple": null,
"Microsoft": null,
"Google": null,
"Gargle":null
}
});
});
</script> Once the autocomplete is added we need to fix the location of the autocomplete search box in the Navigation Bar. In order to achieve it, we should add the aforementioned HTML script in <li> element on the Navigation Bar just above the Menu Items.
After inserting the Autocomplete Search Box in the Navigation Bar, we need to fix the alignment issues. In order to achieve perfect alignment keeping in mind not to affect other autocomplete search boxes, we can ID the current autocomplete search as “topbarsearch” and write CSS properties for this ID.
<!DOCTYPE html>
<html>
<head>
<!--Import Google Icon Font-->
<link href="http://fonts.googleapis.com/icon?family=Material+Icons" rel="stylesheet">
<!--Import materialize.css-->
<link rel="stylesheet" href="https://cdnjs.cloudflare.com/ajax/libs/materialize/0.98.1/css/materialize.min.css">
<!--Let browser know website is optimized for mobile-->
<meta name="viewport" content="width=device-width, initial-scale=1.0"/>
<style>
#topbarsearch .input-field .prefix {
width:0rem !important;
}
#topbarsearch nav ul li:hover, nav ul li.active {
background-color: none !important;
}
.input-field .prefix ~ input, .input-field .prefix ~ textarea, .input-field .prefix ~ label, .input-field .prefix ~ .validate ~ label, .input-field .prefix ~ .autocomplete-content{
margin-left: 1rem !important;
}
</style>
</head>
<body>
<nav class="white">
<div class="nav-wrapper">
<a href="#" class="brand-logo red-text">Logo</a>
<ul class="hide-on-med-and-down right">
<li>
<div class="center row">
<div class="col s12 " >
<div class="row" id="topbarsearch">
<div class="input-field col s6 s12 red-text">
<i class="red-text material-icons prefix">search</i>
<input type="text" placeholder="search" id="autocomplete-input" class="autocomplete red-text" >
</div>
</div>
</div>
</div>
</li>
<li><a href="sass.html" class="red-text">Sass</a></li>
<li><a href="badges.html" class="red-text">Components</a></li>
<li><a href="collapsible.html" class="red-text">JavaScript</a></li>
</ul>
</div>
</nav>
<!--Import jQuery before materialize.js-->
<script type="text/javascript" src="https://code.jquery.com/jquery-2.1.1.min.js"></script>
<script src="https://cdnjs.cloudflare.com/ajax/libs/materialize/0.98.1/js/materialize.min.js"></script>
<script>
$(document).ready(function(){
$('input.autocomplete').autocomplete({
data: {
"Apple": null,
"Microsoft": null,
"Google": null,
"Gargle":null
}
});
});
</script>
</body>
</html>
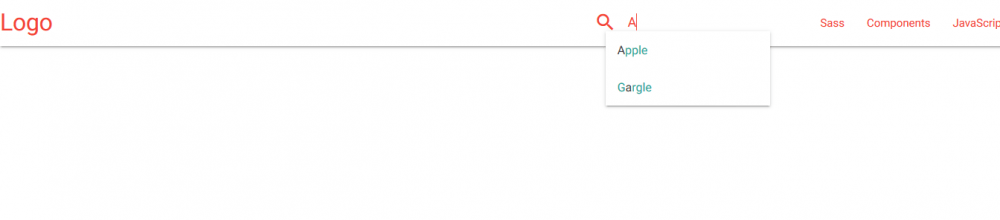
The required Navbar with autocomplete search box is thus created. Note that, the colour and alignment of this search box and navigation bar can be customized by changing the CSS property accordingly.
Learn about Nested Dropdown in MaterializeCSS.