Learn the First step in building Materialize CSS Websites and webpages.
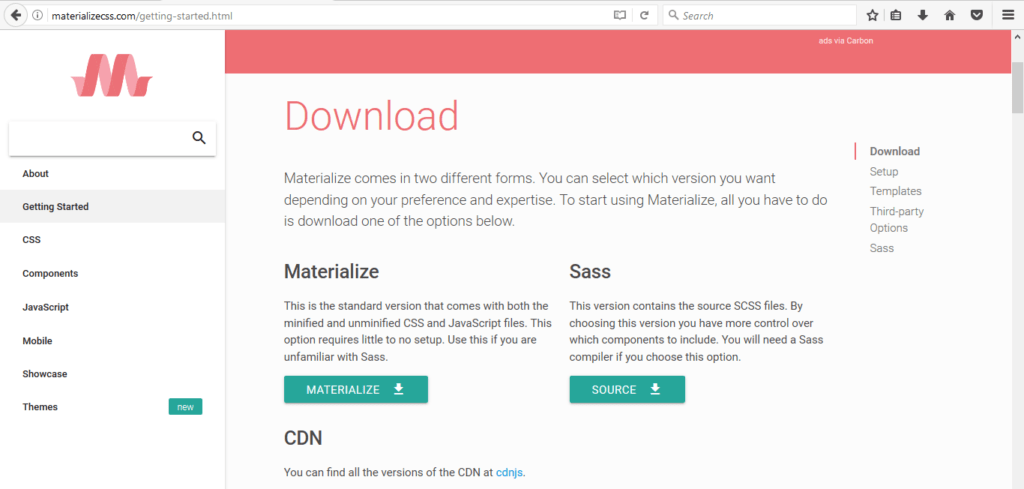
Download the Framework files from the Materialize CSS Framework Website, i.e., http://materializecss.com/getting-started.html. Extract the files and add the extracted files in the Project Directory. For this, you can create a new folder in Desktop.

On the contrary, without downloading the Framework files, we can add the respective CSS, JS and jQuery CDN in the Project HTML File. CDN link can be obtained from the link mentioned
Download the Framework files:
1. Go to the link: http://materializecss.com/getting-started.html
2. Download the Materialize CSS files
3. Once you have downloaded the zip file. You can extract to get the following files

The extracted folder contains CSS, JS and Fonts folder which contains respective files. Materialize CSS by default has Roboto font which can be changed as per requirement.
Creating HTML Pages
In order to work with CSS, JS and HTML files, we need a text editor, such as Brackets or Sublime Text Editor. It can be downloaded from their respective websites.
After installing the Text Editor, you can add the Project Folder which contains the downloaded Materialize CSS Framework files and creates the index.html file in the folder
Traditional Method
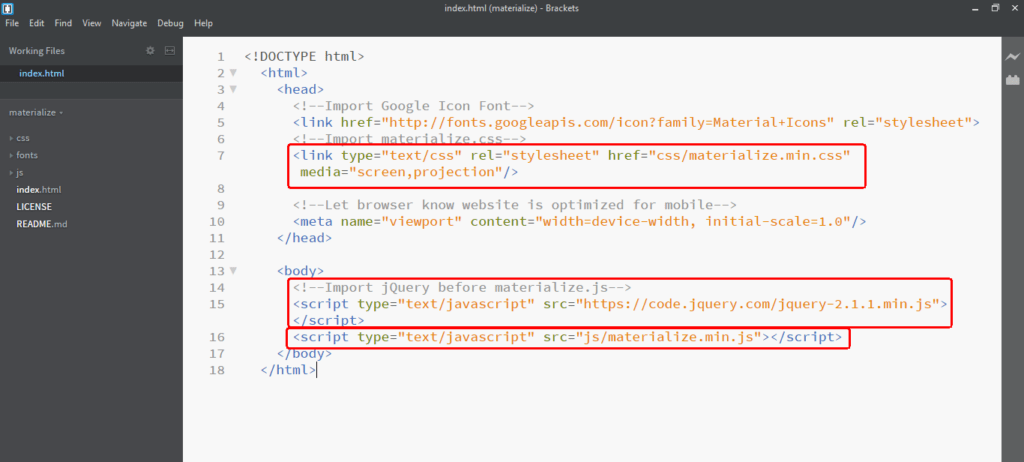
Now in the index file, you can link the corresponding JS, CSS files.

Note that we have used a CDN for the JQuery, you can also download the JQuery from the respective website, move it to the JS folder in our Project and link it as we have linked the Materialize CSS and JS files.
CDN Method
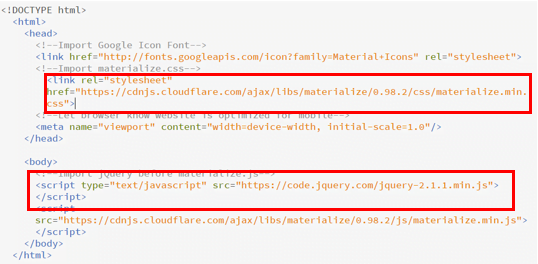
Instead of downloading the files from Materialize CSS we can also directly link the CDN hyperlinks for CSS and JS components which provided in the Materialize CSS website. This method is equal to that of the traditional method.

Now we are done with setting up the first Materialize CSS Project. Going further, we shall see how to create Navigation Bar, Menu, Creating Mega Menu, Cards, Buttons in the website/web pages. Learn about Materialize CSS Features
